Patty’s Suspension Day |
Post Reply 
|
Page 12> |
| Author | |||
Patrick 
Newbie 
Joined: 19 April 2008 Location: Vancouver Status: Offline Points: 5 |
 Post Options Post Options
 Quote Reply Quote Reply
 Topic: Patty’s Suspension Day Topic: Patty’s Suspension DayPosted: 06 July 2011 at 11:07pm |
||
|
Sorry Johnny, I didn't take my camera out to Abbotsford that day. As Gary said, the cut was about two inches from the bottom. The most important measurement is the .75" you need to remove from more or less the middle of the cone. Basically you want to remove as much as possible and NOT have the shocks bottom out. (We triple-checked and measured without the rubber bumper being in place.)
|
|||
 |
|||
|
Car-2-Lo
Senior Post God 

Joined: 14 February 2007 Location: Canada Status: Offline Points: 1266 |
Post Options
Quote Reply
Posted: 06 July 2011 at 9:52pm |
||
Thanks 
|
|||
|
|||
|
karnak
Senior Member 
Joined: 28 August 2009 Location: Canada Status: Offline Points: 349 |
Post Options
Quote Reply
Posted: 06 July 2011 at 8:53pm |
||
|
the cut was made about 2" up from the bottom
 |
|||
|
|||
|
Car-2-Lo
Senior Post God
Joined: 14 February 2007 Location: Canada Status: Offline Points: 1266 |
Post Options
Quote Reply
Posted: 06 July 2011 at 7:59pm |
||
|
Hey Patty, do you have after pic showing shorten cone or where was the cut made ? Thanks Johnny-B-Good 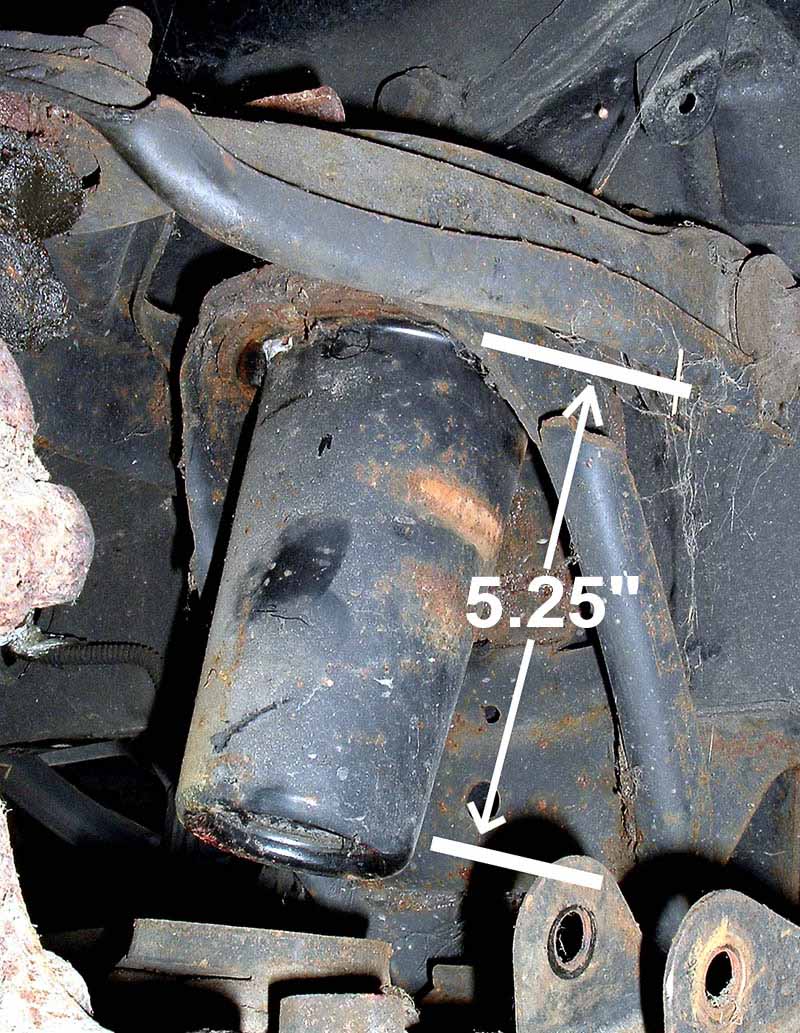
|
|||
|
|||
|
Romeo
Senior Post God

Joined: 16 November 2008 Location: Canada Status: Offline Points: 3033 |
Post Options
Quote Reply
Posted: 05 July 2011 at 11:34pm |
||
MIGHTY DUKE!! lol Man, that was such a fun day though, thanks again for having us! Haven't had that much fun in a long time. |
|||
|
Never shift into reverse without a back-up plan.
|
|||
|
|||
|
karnak
Senior Member
Joined: 28 August 2009 Location: Canada Status: Offline Points: 349 |
Post Options
Quote Reply
Posted: 05 July 2011 at 12:45pm |
||
|
Patrick, it was fun to do and although a long day, it was worth the time to give your car its suspension back.
 Gary |
|||
|
|||
|
Patrick
Newbie
Joined: 19 April 2008 Location: Vancouver Status: Offline Points: 5 |
Post Options
Quote Reply
Posted: 05 July 2011 at 11:10am |
||
|
Well yeah, there's a lot of power to harness with this baby.
|
|||
|
|||
|
Romeo
Senior Post God
Joined: 16 November 2008 Location: Canada Status: Offline Points: 3033 |
Post Options
Quote Reply
Posted: 05 July 2011 at 10:53am |
||
|
I love those spacer plates, they look so beefy.

|
|||
|
Never shift into reverse without a back-up plan.
|
|||
|
|||
|
Patrick
Newbie
Joined: 19 April 2008 Location: Vancouver Status: Offline Points: 5 |
Post Options
Quote Reply
Posted: 05 July 2011 at 12:05am |
||
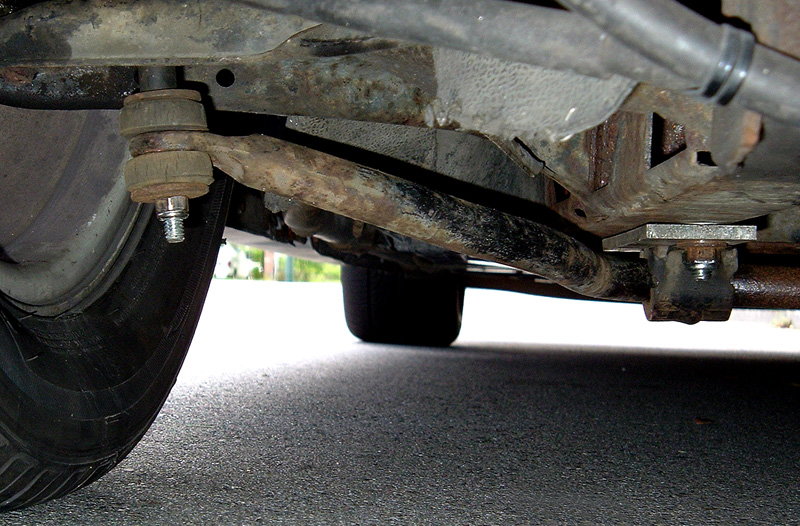
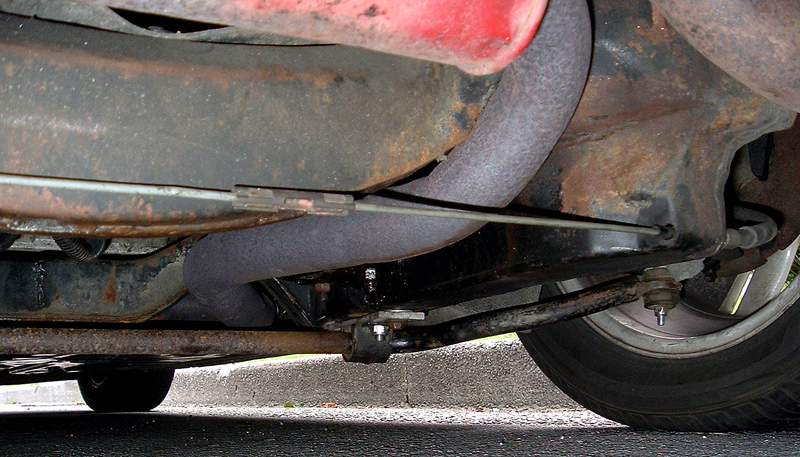
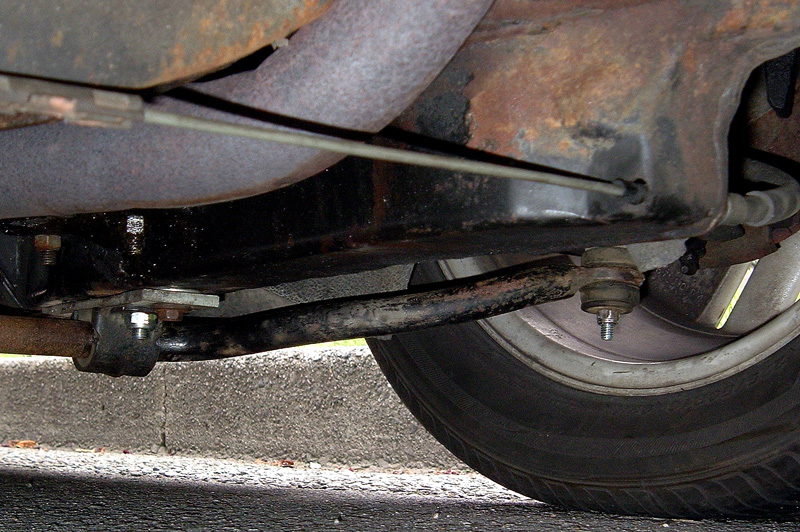
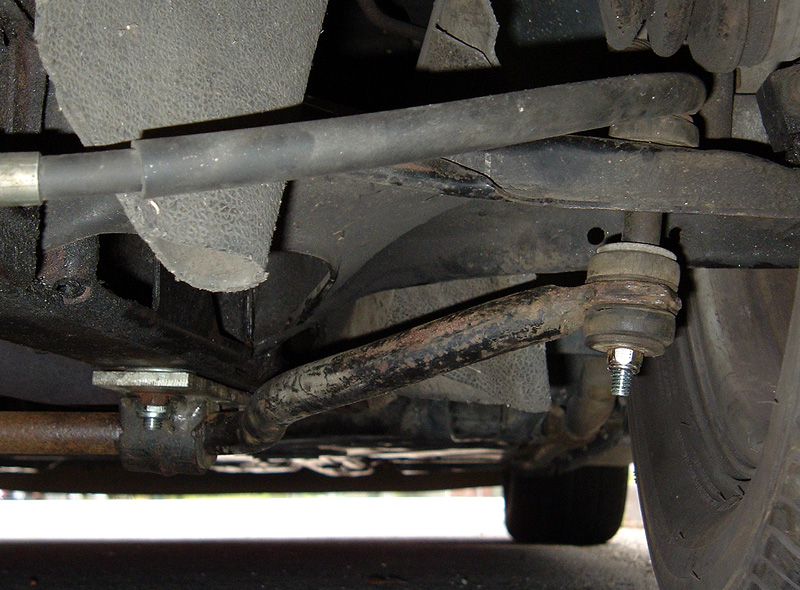
Well, here they are... The first one is actually of my parts car to show what these "cones" are that Gary shortened on the front of my 84's suspension. I had read that taking .75" off was ideal. I wanted to take more off, and we fussed and fiddled to try and do so without bottoming out the shocks. I had forgotten to measure what length the cone was originally, but when we were done, the length had been shortened to 4.5". So how much did we end up shortening these cones? Look at the picture of the uncut cone and figure it out.
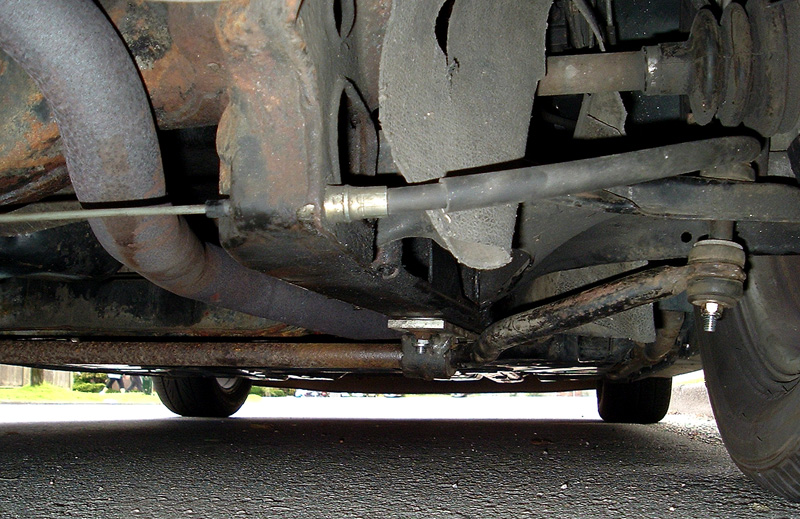
At the bottom of the metal cone is normally a rubber bumper which absorbs any impact if the supension bottoms out. The bumper had been removed prior to this picture being taken, but they're both definitely on my '84. I was quite pleased how well we got the transplanted front sway bar to fit in the back. There were holes already in the control arms in the correct location that only required being made a bit larger. The end link "tubes" were cut down to I believe the width of Gary's finger, and everything lined up great. Notice the "tabs" on the end of the sway bar arms and how parallel they are to the rubber bushings on the end links. Almost perfect!
You'll notice in this shot how there are NO problems with clearance between the head of the end link bolts and the rubber boot of the CVs. No need to cut the top rubber bushing down, lots of room.
The only thing that would've made the job easier would've been if the spacers weren't required for the sway bar mounting brackets, but the holes for them would've required drilling up through the cradle into the control arm bushings. That obviously wouldn't have worked, so using the spacers allowed us to spread the bracket mounting holes further apart, thus avoiding the control arm bushings. (The spacers also allow for more clearance between the sway bar and the exhaust pipe on systems that may require it.) Again, thanks to Gary for being so patient and for doing such a nice job!
|
|||
|
|||
|
Romeo
Senior Post God
Joined: 16 November 2008 Location: Canada Status: Offline Points: 3033 |
Post Options
Quote Reply
Posted: 03 July 2011 at 8:39pm |
||
|
RETRIBUTION. Unfortunately, I've found once one spam bot finds it's way, it usually opens the flood gates... |
|||
|
Never shift into reverse without a back-up plan.
|
|||
|
|||
|
Bassman
Senior Post God
Sir Brian Joined: 12 February 2007 Location: Canada Status: Offline Points: 2501 |
Post Options
Quote Reply
Posted: 03 July 2011 at 8:34pm |
||
|
Huh???we being Spamed?
|
|||
|
Brian (Bassman)
86 GT Fastback 3.2L 2013 Mazda3 Sport GS SkyActive [IMG]http://i170.photobucket.com/albums/u243/Bassman68/BassmanSignature.png"> |
|||
|
|||
|
Romeo
Senior Post God
Joined: 16 November 2008 Location: Canada Status: Offline Points: 3033 |
Post Options
Quote Reply
Posted: 28 June 2011 at 8:16pm |
||
|
lol OM NOM NOM. |
|||
|
Never shift into reverse without a back-up plan.
|
|||
|
|||
|
Colby
Admin Group
Joined: 30 March 2009 Location: Abbotsford/Sask Status: Offline Points: 665 |
Post Options
Quote Reply
Posted: 28 June 2011 at 2:22pm |
||
Hehe, that's what you get when you ask me to take pictures. |
|||
|
88 Formula 5 speed
|
|||
|
|||
|
Romeo
Senior Post God
Joined: 16 November 2008 Location: Canada Status: Offline Points: 3033 |
Post Options
Quote Reply
Posted: 28 June 2011 at 11:13am |
||
|
Oh, we both forgot to mention you installed zero-lash end links on your front sway bar, and Colby on his rear sway bar.
|
|||
|
Never shift into reverse without a back-up plan.
|
|||
|
|||
|
Patrick
Newbie
Joined: 19 April 2008 Location: Vancouver Status: Offline Points: 5 |
Post Options
Quote Reply
Posted: 28 June 2011 at 2:02am |
||
|
In that top picture I appear to be eating my right shoulder while pointing at my side view mirror. I do like seeing three Fieros all being worked on at the same time though.
|
|||
|
|||
|
Patrick
Newbie
Joined: 19 April 2008 Location: Vancouver Status: Offline Points: 5 |
Post Options
Quote Reply
Posted: 28 June 2011 at 1:55am |
||
|
A recap of last Saturday... Gary invited me to come out to his place to perform the same modification that he did to Colby�s Fiero which was necessitated because of cutting the front springs down to lower the car. We started talking about making these mods on This page. Unknown to me until recently, my �84 has been riding on my front suspension bumpstops. Makes for a rough ride and probably has been making my life more difficult at autocross. The procedure that Gary had done to Colby�s Fiero involved cutting the end off the metal bumpstops, shortening the remaining cone about an inch or so, and then welding the end of the metal bumpstop back on. It�s necessary to weld the end back on because it holds the rubber bumper which prevents a jarring metal on metal jolt if the suspension reaches the end of its travel. It took quite awhile to do all this, as I was being rather particular about how much we could shorten the bumpstops for maximum travel without bottoming out and ruining the shocks. Gary�s a very patient guy and tolerated my fussiness awfully well. It remains to be seen whether I get invited out there again. But that wasn�t all. Oh no, no, no... I also wanted to install a rear sway bar. Colby actually had an aftermarket one there I could�ve installed, but I wanted to make use of an extra front Fiero sway bar I had. I told Colby I enjoyed the challenge of making it fit. I hope Gary did as well, because mounting it took us a whole bunch of hours as well. To make a long story short we mounted the sway bar with the bow to the front and arms pointing to the back of the car. There are several advantages to doing it this way as opposed to mounting it the other way around (with the arms pointing towards the front). It�s easier to get a jack under the back of the Fiero (because the wide part of the bar is further forward and therefore not in the way), and if the end link bolts ever break, the sway bar arms will simply drag harmlessly on the ground as opposed to digging in and launching the rear end of the car! I�ll take some pictures soon of what we did. I�m quite pleased with what we accomplished on Saturday. The car feels great. I now have a working front suspension again, and the rear sway bar has certainly changed the way the Fiero feels when taking corners at speed. I won�t know how it ultimately feels for sure until I�m on the track, but I�m confident the difference will be quite positive. My thanks to Gary for inviting me out to his place and special thanks for all the work he did. Very much appreciated. He's obviously a very handy guy around cars. And yeah, it was fun to have Tristan come along as well. His "youthful enthusiasm" kept us all loose.
|
|||
|
|||
|
Patrick
Newbie
Joined: 19 April 2008 Location: Vancouver Status: Offline Points: 5 |
Post Options
Quote Reply
Posted: 27 June 2011 at 12:33pm |
||
|
Usually it's the other place where people catch fire!
It was a great day. I'll post more about it tonight.
|
|||
|
|||
|
Dawg
Senior Member

Joined: 15 August 2009 Location: Canada Status: Offline Points: 988 |
Post Options
Quote Reply
Posted: 27 June 2011 at 9:47am |
||
|
Sounds like you guys were in Fiero heaven....
The Dawg |
|||
|
You dream it up....I'll make it
|
|||
|
|||
|
Romeo
Senior Post God
Joined: 16 November 2008 Location: Canada Status: Offline Points: 3033 |
Post Options
Quote Reply
Posted: 26 June 2011 at 11:01pm |
||
|
Hey, I'd be down.

|
|||
|
Never shift into reverse without a back-up plan.
|
|||
|
|||
|
Bassman
Senior Post God
Sir Brian Joined: 12 February 2007 Location: Canada Status: Offline Points: 2501 |
Post Options
Quote Reply
Posted: 26 June 2011 at 10:56pm |
||
|
Been an active weekend...need to have you guys over for a BBQ one night soon |
|||
|
Brian (Bassman)
86 GT Fastback 3.2L 2013 Mazda3 Sport GS SkyActive [IMG]http://i170.photobucket.com/albums/u243/Bassman68/BassmanSignature.png"> |
|||
|
|||
|
Post Reply
|
Page 12> |
 Tweet
Tweet
|
| Forum Jump | Forum Permissions You cannot post new topics in this forum You cannot reply to topics in this forum You cannot delete your posts in this forum You cannot edit your posts in this forum You cannot create polls in this forum You cannot vote in polls in this forum |


 Topic Options
 Car-2-Lo wrote: